


Tutorial - I am so happy to be able to pass on this fabulous and world famous Tall Cupcake tutorial.
STEP 1 – BAKE THOSE CUPCAKES!
Bake a batch of cupcakes( in paper liners or see note below) and allow them to cool completely.
We will need only three from the batch but you may of course make more depending on your confidence. Pop the rest in the freezer for next time!
When trialling the processes for making Tall Cupcakes I tried cutting the cylinders of cake from a sheet cake, but as there was a lot of waste involved (unusable areas between circles) it worked out more cost effective to bake cupcakes and use disposable liners and have minimal waste as you will see in the next step.
NOTE * You could always use silicone cupcake bake cups if you have any luck with them (but I never have!) and this would reduce your waste even further.

STEP 2 – TRIMMING THE CUPCAKES
When the cupcakes are cool, unwrap them and turn them upside down on your work surface. (If your cupcakes form a little dome while baking, grab a sharp serrated knife and carefully level the surface of the cake. (We will be stacking the cupcakes later so flatter the better!)
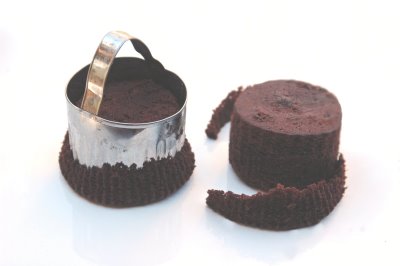
As pictured below, use a pastry cutter the same size as the base of the cupcakes and trim away the edges of the ‘tops’ so that you are left with a round, even cylindrical shaped cupcake. Use this step on all cupcakes to make them the same size, exactness matters!
As you can see I use a (well used!) scalloped cutter as it seems to cut through the cake better that the smooth round ones.
STEP 3 – PUNCHING OUT THE CENTRES
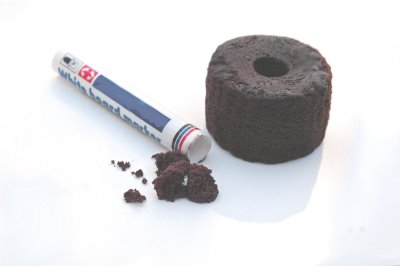
Using a small cylindrical tool with a diameter no larger than 20mm ( My specific tool of choice is the empty barrel of a whiteboard marker, cleaned and sanitised of course!) carefully punch the centres out of each cupcake. Discard the waste (by way of bin or nibbling).
STEP 4 – FILLING THE CENTRES
Clean up the work area and arrange all the punched cupcakes so they are in easy reach.
Using a piping tip close to the same size as the centre hole, pipe your buttercream into the middle of each leaving a reasonable amount of peeping out from the top.

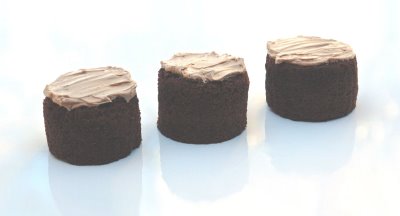
STEP 5 – SMOOTHING THE BUTTERCREAM
Grab your small spatula and simply spread out the excess buttercream evenly over the top of each cupcake. Don’t worry about being too exact here as we will be stacking and applying a little pressure in the next step.
 STEP 6 – STACKING THE CUPCAKES
There are 3 cupcakes to one Tall Cupcake so carefully and with minimal pressure, stack 3 cupcakes one on top of the other. If any buttercream squishes out from the joins just spread it around the cake.
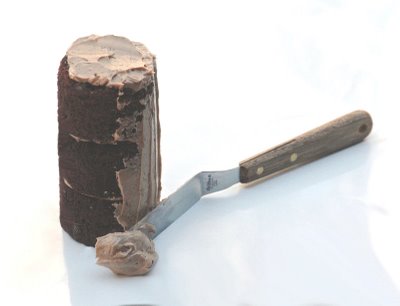
STEP 7 – FROSTING THE CAKE
A coating of buttercream is used here to provide a crumb coat and good adhesion for the fondant layer in the next step.
It is important that you chill the frosted cakes for about half an hour ( or less if you are impatient like me and end up popping them in the freezer for 15 minutes.).
As you can see I am not very particular with the frosting in this step because once the fondant is applied the buttercream has started to soften again and is evened out by the pressure achieved by rolling the log shape on the work surface.

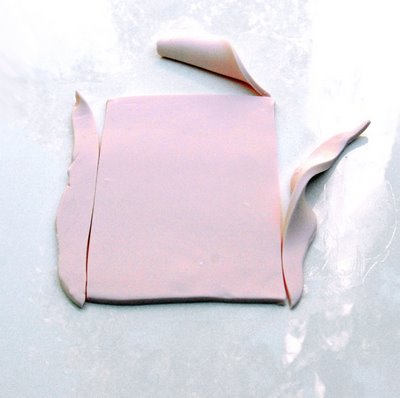
STEP 8 – PREPARING THE FONDANT
While the frosted cakes are chilling in the fridge, prepare the fondant.
Colour the fondant to you desire hue, roll it to about a 5mm thickness and trim into a rectangle 130mm wide (this will be the height) and as wide as it needs to be to wrap around the cake.
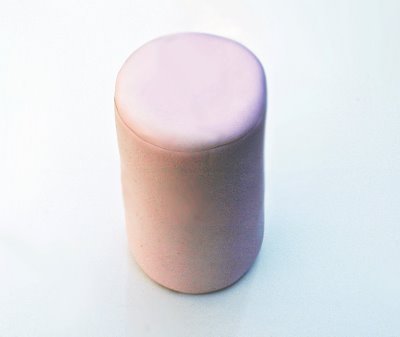
STEP 9 – APPLYING THE FONDANT
Remove your cake from the fridge and using the same technique for making Sushi, roll the cake up in the fondant. Using a float or icing smoother roll the cake back and forth to even out the underlying buttercream and remove any lumps and bumps. Pop the cake back into the fridge while you make the tops.

STEP 10 – APPLYING THE FONDANT TOPS
Roll out some more fondant in the same colour and thickness. Use a circle cutter to cut the tops for the cakes. Remove the cake from the fridge and apply the tops.
Using a smoother work the joins so they are as seamless as possible.
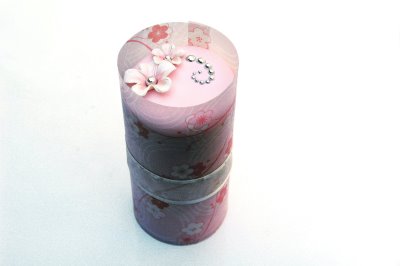
STEP 12 – APPLYING THE VELLUM
I love the acid free translucent vellums available online or at craft stores. With such a huge range to choose from, I spent near a small fortune on these lovelies!
Simply cut your vellum or chosen paper to size allowing for a slight overhang at the top of the cake, of course if you’d rather have the paper sit flush with the top of the cake make the adjustments accordingly.
Roll the cake in the vellum and secure with glue dots or a small amount of sticking tape.

STEP 12 – DECORATING!
Choose a ribbon to compliment your colour scheme and attach it to the cake, whether that be as a bow or minimal band. Make some pretty gumpaste /fondant decorations in whatever design you desire and apply to the top surface of the cake.
Let your creativity run free!
No comments:
Post a Comment