
These beautiful little blooms are easy to make, and comfortable to wear. You can customize them to work with any color palette.
SO excited to introduce a new DIY contributor to the cafe....Laurie Cinotto of La La Laurie. Laurie shares her DIY.....Feather-Light Hair Flowers with us....Enjoy!
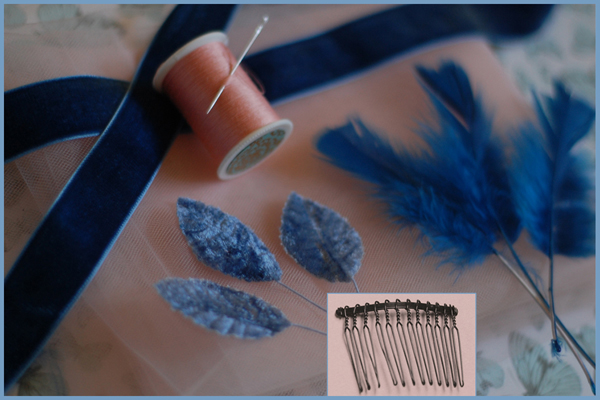
Materials
8 - six inch squares of tulle
9 inches of velvet ribbon (3/4 inch wide)
A few feathers
3 velvet leaves
A spool of thread
A long, sharp needle
Thread
A small hair comb
Scissors

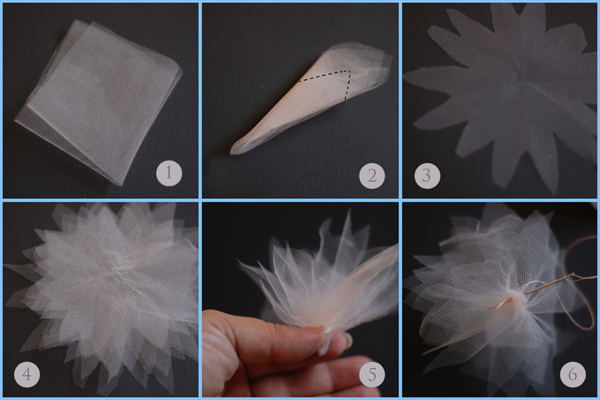
| First, the Flower... 1. Take one of your tulle squares, fold it in half, then into quarters. (see figure 1) 2. Fold in half again to make a triangle, and then fold in half again. (It’s just like your folding a snowflake). 3. Cut a rounded “V” in the non-pointy end of the triangle. (see figure 2) 4. When you unfold your tulle, you'll have a daisy shape. (see figure 3) 5. Repeat the above steps, and cut out 7 more daisies. They can vary in size and petal shape. 6. When all the daisies are cut, layer them together. (see figure 4) 7. Thread your needle and knot the end of the thread. Put a couple of stitches through the center of the stack to keep them together and tie off. 8. Pick up the stack, pinch the center between your thumb and index finger. Fluff the petals upward. (see figure 5) 9. Run your needle and thread through the pinched point of the flower, about a quarter inch from the very bottom. Go back and forth and around several times to secure all the layers, and tighten your bloom. (see step 6) |
 * * |
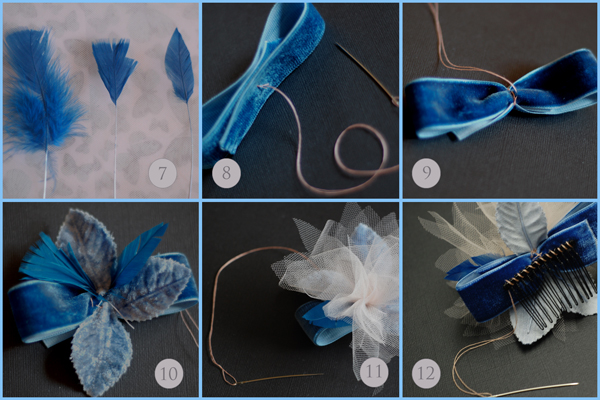
Putting it all together... 10. Take a few feathers and strip off the lower fluff, leaving a small tuft at the top. Trim into a neat point, using your scissors. Set aside. (see figure 7) 11. Fold your ribbon into a loop, with the ends overlapping in the middle. Make a couple of small stitches through all the layers to secure. (see figure 8) 12. Run your thread around the center a few times and cinch the ribbon so it looks like a bow. Run your needle and thread through the center and back and knot off. 13. Take your velvet leaves, trim off the wire ends, and stitch them down in the center of the bow. (see figure 10) 14. Trim the feather tails, then stitch the feathers down too. (see figure 10) 15. Place your bloom in the center of the leaves and feathers. Stitch it down using several small stitches. . Go through all the ribbon layers to make sure it's attached securely. (see figure 11 16. Center your comb on the back side of the bow and stitch into place. ( see figure 12) |

 * * |
And now the finished product........simply beautiful! |
 |

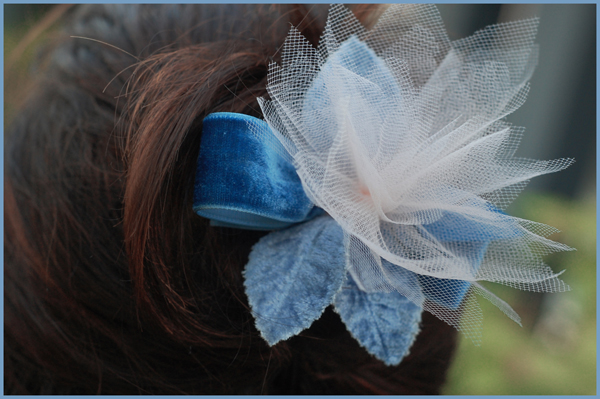 |
Thank you SO much Laurie, your handmade hair flowers are just too cute...perfect for the bride and her bridesmaid
No comments:
Post a Comment